# 扩展服务开发
# 概述
扩展服务适用场景:需要基于MapGIS传统内核Api而开发的中小型Web应用程序
不适用场景:不适合大型应用构建(大型应用使用独立服务或微服务构建),因为其能力受制于插件机制,不支持SpringBoot等大型框架。
扩展服务以插件形式承载到IGServer服务器中,以插件自己独立的classLoader加载到IGServer的JVM进程中,避免了Java类冲突,保证各个插件与IGServer框架之间的类不会相互污染,同时也保障了各个子模块的安全。
独立的classLoader非常重要,因为java生态圈的三方依赖非常多,依赖的版本冲突问题非常常见。各个插件、框架,彼此之间存在公共依赖的情况时常发生,通过独立的classLoader解决了插件、框架的兼容问题。
# 依赖
插件中依赖如果已经存在于igserver-webapp包中,将其设置为<scope>provided</scope>,因为插件可以共享框架中已存在的依赖,如果将重复的依赖加入到插件,只会增加插件的大小;
注意如果插件中某个依赖与框架依赖同时存在,在版本不一致,这时需要在插件添加其依赖,保证插件正常运行,如果插件和框架同时存在某个依赖,插件依赖优先,类似tomcat中的webapp,这样保证不会出现类的冲突。
特殊依赖,插件框架自身的依赖必须使用igs框架,插件中必须设置<scope>provided</scope>,否则插件无法加载。插件框架自身的依赖包括org.pf4j:pf4j、org.pf4j:pf4j-spring、org.springframework:spring-webmvc、io.swagger.core.v3:swagger-annotations、jakarta.servlet:jakarta.servlet-api、org.slf4j:slf4j-api。
平台内核中间层依赖必须使用框架的,插件中必须设置<scope>provided</scope>,否则插件无法加载。
# 依赖声明
插件必须有如下依赖
  <dependencies>
     <!--插件主框架-->
     <dependency>
         <groupId>org.pf4j</groupId>
         <artifactId>pf4j</artifactId>
         <!-- 必须与igs框架依赖版本保持一致,如果可连内网私有仓库,并通过依赖管理导入mapgis-igs,则不需要标记版本 -->
         <version>X.X.X</version>
         <scope>provided</scope>
     </dependency>
     <dependency>
         <groupId>org.pf4j</groupId>
         <artifactId>pf4j-spring</artifactId>
         <!-- 必须与igs框架依赖版本保持一致,如果可连内网私有仓库,并通过依赖管理导入mapgis-igs,则不需要标记版本 -->
         <version>X.X.X</version>
         <scope>provided</scope>
     </dependency>
     <!--igserver扩展接口-->
     <dependency>
         <groupId>com.zondy.mapgis.igs</groupId>
         <artifactId>mapgis-igs-api</artifactId>
         <!--必须与igs框架依赖版本保持一致,如果可连内网私有仓库,并通过依赖管理导入mapgis-igs,则不需要标记版本 -->
         <version>10.6.X.X</version>
         <scope>provided</scope>
     </dependency>
     <!--springmvc标准-->
     <dependency>
         <groupId>org.springframework</groupId>
         <artifactId>spring-webmvc</artifactId>
         <!-- 必须与igs框架依赖版本保持一致,如果可连内网私有仓库,并通过依赖管理导入mapgis-igs,则不需要标记版本 -->
         <version>X.X.X</version>
         <scope>provided</scope>
     <!--open api3标准-->
     </dependency>
          <dependency>
            <groupId>io.swagger.core.v3</groupId>
            <artifactId>swagger-annotations</artifactId>
            <!-- 必须与igs框架依赖版本保持一致,如果可连内网私有仓库,并通过依赖管理导入mapgis-igs,则不需要标记版本 -->
            <version>X.X.X</version>
            <scope>provided</scope>
        </dependency>
     <!--java servelet标准-->
     <dependency>
         <groupId>jakarta.servlet</groupId>
         <artifactId>jakarta.servlet-api</artifactId>
         <!-- 必须与igs框架依赖版本保持一致,如果可连内网私有仓库,并通过依赖管理导入mapgis-igs,则不需要标记版本 -->
         <version>X.X.X</version>
         <scope>provided</scope>
     </dependency>
     <!--推荐日志框架-->
     <dependency>
         <groupId>org.slf4j</groupId>
         <artifactId>slf4j-api</artifactId>
         <!-- 必须与igs框架依赖版本保持一致,如果可连内网私有仓库,并通过依赖管理导入mapgis-igs,则不需要标记版本 -->
         <version>X.X.X</version>
         <scope>provided</scope>
     </dependency>
      <!--平台中间层依赖,可选,如果需要则添加-->
     <dependency>
          <groupId>com.zondy.mapgis</groupId>
          <artifactId>mapgis_geoanalysis</artifactId>
          <version>1.0.0</version>
          <scope>provided</scope>
     </dependency>
     <dependency>
         <groupId>com.zondy.mapgis</groupId>
         <artifactId>mapgis_geomap</artifactId>
         <version>1.0.0</version>
         <scope>provided</scope>
      </dependency>
      <dependency>
          <groupId>com.zondy.mapgis</groupId>
          <artifactId>mapgis_geoobjects</artifactId>
          <version>1.0.0</version>
          <scope>provided</scope>
      </dependency>
      <dependency>
          <groupId>com.zondy.mapgis</groupId>
          <artifactId>mapgis_geodatabase</artifactId>
          <version>1.0.0</version>
          <scope>provided</scope>
      </dependency>
  </dependencies>
2
3
4
5
6
7
8
9
10
11
12
13
14
15
16
17
18
19
20
21
22
23
24
25
26
27
28
29
30
31
32
33
34
35
36
37
38
39
40
41
42
43
44
45
46
47
48
49
50
51
52
53
54
55
56
57
58
59
60
61
62
63
64
65
66
67
68
69
70
71
72
73
74
75
76
77
78
79
80
81
82
# 无私有maven仓库环境
igserver框架的所有三方依赖可将igserver-webapp-*.jar使用压缩工具打开,如下图。
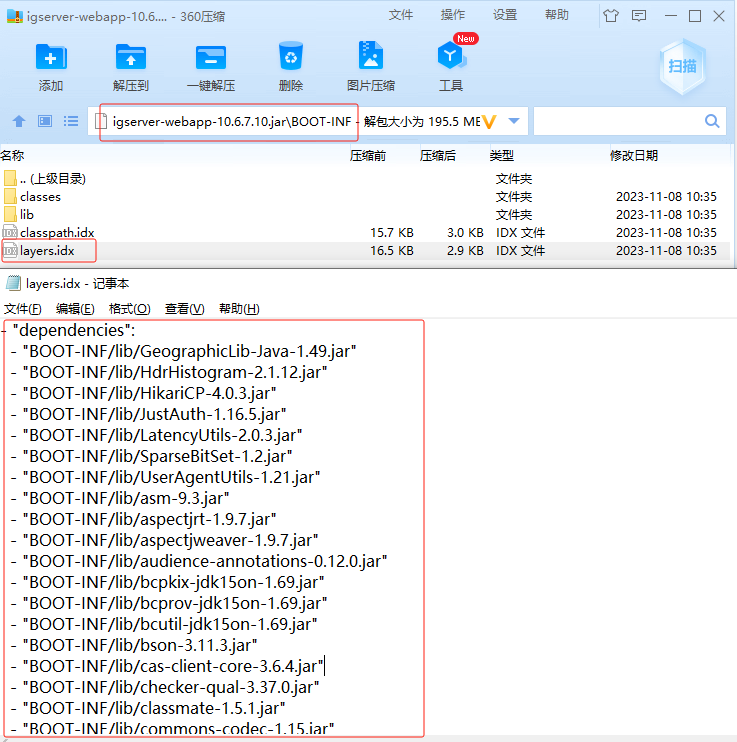
其中压缩包下BOOT-INF/layers.idx文件中节点dependencies下记录了所有三方依赖的jar包,application节点记录了内部依赖。
其中lib文件夹为所有依赖的jar,需要解压获取依赖jar,并手动安装依赖
安装mapgis-igs-api-10.x.x.x.jar,注意修改groupId、artifactId、version与插件依赖的一致
@REM 注意修改${dir}、version参数值和jar包文件名
mvn install:install-file -DgroupId=com.zondy.mapgis.igs -DartifactId=mapgis-igs-api -Dversion=10.x.x.x -Dpackaging=jar -Dfile=${dir}/mapgis-igs-api-10.x.x.x.jar
2
如果需要开发MapGIS内核相关功能,需要安装平台中间层jar包mapgis_geomap-1.0.0.jar、mapgis_geoobjects-1.0.0.jar、mapgis_geodatabase-1.0.0.jar、mapgis_geoanalysis-1.0.0.jar,注意修改groupId、artifactId、version与插件依赖的一致
@REM 注意修改${dir}
mvn install:install-file -DgroupId=com.zondy.mapgis -DartifactId=mapgis_geomap -Dversion=1.0.0 -Dpackaging=jar -Dfile=${dir}/mapgis_geomap-1.0.0.jar
mvn install:install-file -DgroupId=com.zondy.mapgis -DartifactId=mapgis_geoobjects -Dversion=1.0.0 -Dpackaging=jar -Dfile=${dir}/mapgis_geoobjects-1.0.0.jar
mvn install:install-file -DgroupId=com.zondy.mapgis -DartifactId=mapgis_geodatabase -Dversion=1.0.0 -Dpackaging=jar -Dfile=${dir}/mapgis_geodatabase-1.0.0.jar
mvn install:install-file -DgroupId=com.zondy.mapgis -DartifactId=mapgis_geoanalysis -Dversion=1.0.0 -Dpackaging=jar -Dfile=${dir}/mapgis_geoanalysis-1.0.0.jar
2
3
4
5
# 使用私有maven仓库
内网maven仓库地址为http://192.168.176.10:8081/nexus (opens new window),研发中心内网可用,pom中添加仓库
    <repositories>
        <repository>
            <id>igs</id>
            <url>http://192.168.176.10:8081/nexus/repository/maven-releases/</url>
            <releases>
                <enabled>true</enabled>
            </releases>
            <snapshots>
                <enabled>true</enabled>
            </snapshots>
        </repository>
     </repositories>
2
3
4
5
6
7
8
9
10
11
12
扩展插件项目可通过com.zondy.mapgis:mapgis-igs:${igserver.version}`管理igs的依赖,在项目中添加如下
    <dependencyManagement>
        <dependencies>
            <dependency>
                <groupId>com.zondy.mapgis</groupId>
                <artifactId>mapgis-igs</artifactId>
                <version>${igserver.version}</version>
                <type>pom</type>
                <scope>import</scope>
            </dependency>
         </dependencies>
    </dependencyManagement>
2
3
4
5
6
7
8
9
10
11
这时,插件中的igs依赖,则无需指定版本号。
# 打包
# 打包为jar (one-jar)
推荐插件打包使用maven-assembly-plugin,打包为one-jar,如下
  <plugin>
      <groupId>org.apache.maven.plugins</groupId>
      <artifactId>maven-assembly-plugin</artifactId>
      <version>3.1.0</version>
      <configuration>
          <descriptorRefs>
              <descriptorRef>jar-with-dependencies</descriptorRef>
          </descriptorRefs>
          <finalName>${project.artifactId}-plugin</finalName>
          <appendAssemblyId>false</appendAssemblyId>
          <attach>false</attach>
          <archive>
              <manifest>
                  <addDefaultImplementationEntries>true</addDefaultImplementationEntries>
                  <addDefaultSpecificationEntries>true</addDefaultSpecificationEntries>
              </manifest>
              <manifestEntries>
                  <Plugin-Id>${plugin.id}</Plugin-Id>
                  <Plugin-Version>${plugin.version}</Plugin-Version>
                  <Plugin-Provider>${plugin.provider}</Plugin-Provider>
                  <Plugin-Class>${plugin.class}</Plugin-Class>
                  <Plugin-Dependencies>${plugin.dependencies}</Plugin-Dependencies>
              </manifestEntries>
          </archive>
      </configuration>
      <executions>
          <execution>
              <id>make-assembly</id>
              <phase>package</phase>
              <goals>
                  <goal>single</goal>
              </goals>
          </execution>
      </executions>
  </plugin>
2
3
4
5
6
7
8
9
10
11
12
13
14
15
16
17
18
19
20
21
22
23
24
25
26
27
28
29
30
31
32
33
34
35
# 打包为zip
插件同时支持打包为zip格式,显著的差别是将插件的依赖jar原封不动的放到lib文件夹下,zip格式插件包在运行时会自动解压到同级目录。
<build>
    <plugins>
        <plugin>
            <groupId>org.apache.maven.plugins</groupId>
            <artifactId>maven-jar-plugin</artifactId>
            <configuration>
                <archive>
                    <manifestEntries>
                        <Plugin-Id>${plugin.id}</Plugin-Id>
                        <Plugin-Class>${plugin.class}</Plugin-Class>
                        <Plugin-Version>${plugin.version}</Plugin-Version>
                        <Plugin-Provider>${plugin.provider}</Plugin-Provider>
                        <Plugin-Dependencies>${plugin.dependencies}</Plugin-Dependencies>
                    </manifestEntries>
                </archive>
            </configuration>
        </plugin>

        <plugin>
            <groupId>org.apache.maven.plugins</groupId>
            <artifactId>maven-antrun-plugin</artifactId>
            <executions>
                <execution>
                    <id>unzip jar file</id>
                    <phase>package</phase>
                    <configuration>
                        <target>
                            <unzip src="target/${project.artifactId}-${project.version}.${project.packaging}"
                                    dest="target/plugin-classes"/>
                        </target>
                    </configuration>
                    <goals>
                        <goal>run</goal>
                    </goals>
                </execution>
            </executions>
        </plugin>

        <plugin>
            <artifactId>maven-assembly-plugin</artifactId>
            <configuration>
                <descriptors>
                    <descriptor>
                        src/main/assembly/assembly.xml
                    </descriptor>
                </descriptors>
                <appendAssemblyId>false</appendAssemblyId>
            </configuration>
            <executions>
                <execution>
                    <id>make-assembly</id>
                    <phase>package</phase>
                    <goals>
                        <goal>single</goal>
                    </goals>
                </execution>
            </executions>
        </plugin>

        <plugin>
            <artifactId>maven-deploy-plugin</artifactId>
            <configuration>
                <skip>true</skip>
            </configuration>
        </plugin>
    </plugins>
</build>
2
3
4
5
6
7
8
9
10
11
12
13
14
15
16
17
18
19
20
21
22
23
24
25
26
27
28
29
30
31
32
33
34
35
36
37
38
39
40
41
42
43
44
45
46
47
48
49
50
51
52
53
54
55
56
57
58
59
60
61
62
63
64
65
66
67
在src/main/assembly中添加assembly.xml,内容如下
<assembly>
    <id>plugin</id>
    <formats>
        <format>zip</format>
    </formats>
    <includeBaseDirectory>false</includeBaseDirectory>
    <dependencySets>
        <dependencySet>
            <useProjectArtifact>false</useProjectArtifact>
            <scope>runtime</scope>
            <outputDirectory>lib</outputDirectory>
            <includes>
                <include>*:jar:*</include>
            </includes>
        </dependencySet>
    </dependencySets>
    <!--
    <fileSets>
        <fileSet>
            <directory>target/classes</directory>
            <outputDirectory>classes</outputDirectory>
        </fileSet>
    </fileSets>
    -->
    <fileSets>
        <fileSet>
            <directory>target/plugin-classes</directory>
            <outputDirectory>classes</outputDirectory>
        </fileSet>
    </fileSets>
</assembly>
2
3
4
5
6
7
8
9
10
11
12
13
14
15
16
17
18
19
20
21
22
23
24
25
26
27
28
29
30
31
打包生成zip包,内部包括classes文件夹和lib文件夹
# 插件属性
其中必须指定插件的属性,注意插件id必须保证唯一性,class为Plugin实现类,如果是扩展的SpringMvc REST服务,服务承载到IGServer中时将添加/igs/rest/services/{plugin-id}/ExtensionServer,示例如下
 <properties>
     <!-- Override below properties in each plugin's pom.xml -->
     <!-- 插件实现中必须包括如下配置项-->
     <plugin.id>igs-demo-plugin</plugin.id>
     <plugin.class>com.zondy.mapgis.igs.plugins.demo.DemoPlugin</plugin.class>
     <plugin.version>0.0.1</plugin.version>
     <plugin.provider>MapGIS</plugin.provider>
     <plugin.dependencies/>
 </properties>
2
3
4
5
6
7
8
9
在插件项目目录下执行
mvn clean package
将在target目录下生成插件文件mvc-service-extension-demo-plugin.jar
源码调试,在插件模块目录下创建plugin.properties,示例如下
 plugin.id=igs-demo-plugin
 plugin.class=com.example.plugins.server.DemoPlugin
 plugin.version=0.0.1
 plugin.provider=MapGIS
 plugin.dependencies=
2
3
4
5
如果多个插件之间有依赖关系,这里通过plugin.dependencies属性声明插件的依赖项,具体依赖声明写法参考pf4j插件 (opens new window)
# 开发
创建plugin类,即上一节中的plugin.class,示例如下
@Slf4j
public class DemoPlugin extends SpringPlugin implements FrameworkContextCapable {

    public DemoPlugin(PluginWrapper wrapper) {
        super(wrapper);
    }

    @Override
    public void start() {
        log.info("DemoPlugin.start,mode:{}", wrapper.getRuntimeMode());
    }

    @Override
    public void stop() {
        log.info("DemoPlugin.stop()");
    }

    @Override
    protected ApplicationContext createApplicationContext() {
        //这里创建插件自身的IOC容器
        AnnotationConfigApplicationContext applicationContext = new AnnotationConfigApplicationContext();
        applicationContext.setClassLoader(getWrapper().getPluginClassLoader());
        applicationContext.register(SpringConfiguration.class);
        applicationContext.refresh();
        return applicationContext;
    }

    @Override
    public void setFrameworkApplicationContext(ApplicationContext applicationContext) {
        //这里获取框架的IOC容器
        log.info("framework applicationContext:" + applicationContext.getApplicationName());
    }
}
2
3
4
5
6
7
8
9
10
11
12
13
14
15
16
17
18
19
20
21
22
23
24
25
26
27
28
29
30
31
32
33
上述代码,声明了一个SpringPlugin,并创建了一个插件自身的IOC容器,注意如果插件内部不需要spring IOC,则实现Plugin接口即可。
这里可选择实现FrameworkContextCapable接口来获取框架的IOC容器。
创建SpringMvc Controller扩展服务实现类,添加spring的REST服务注解@RestController或@Controller,同时必须添加注解@Extension和实现Rest扩展服务接口ControllerExtension,可选择实现FrameworkContextCapable接口来获取框架的IOC容器,示例如下
@Tag(name = "demo-plugin扩展服务")
@RestController
@Extension
@RequestMapping("test")
public class TestController implements ControllerExtension, FrameworkContextCapable {

    private ApplicationContext applicationContext;
    @Autowired
    private MessageProvider messageProvider;

    @Override
    public void setFrameworkApplicationContext(ApplicationContext applicationContext) {
        this.applicationContext = applicationContext;
    }

    @Operation(summary = "获取结果信息")
    @RequestMapping(value = "/res", method = {RequestMethod.GET})
    public ResObj getRes() {
        String msg = messageProvider.getMessage();
        SrsManager srsManager = applicationContext.getBean(SrsManager.class);
        ResObj resObj = new ResObj();
        resObj.setMessage(msg);
        resObj.setData(srsManager.getMapgisSrsName(4326));
        return resObj;
    }
}
2
3
4
5
6
7
8
9
10
11
12
13
14
15
16
17
18
19
20
21
22
23
24
25
26
其中注解@Tag,@Operation为OpenApi3注解,用于生成swagger文档
上述示例REST服务的访问基地址为http://localhost:8089/igs/rest/services/igs-demo-plugin/ExtensionServer
其中
igs-demo-plugin为插件id,对应上文plugin.properties或pom.xml文件中plugin.id的属性值
IGServer自动为扩展服务添加的REST服务前缀,接口ControllerExtension默认实现了服务自述信息方法
public interface ControllerExtension extends ExtensionPoint {
    /**
     * 当前REST扩展服务的自述信息、
     * 用于在IGServer服务管理中调用服务基地址时,返回的服务信息
     * 开发者可根据实际需要,实现该方法,将扩展服务的详细自述信息通过该接口提供给使用者
     *
     * @return 返回text的信息
     */
    @GetMapping("")
    default ResponseEntity<?> getServiceInfo() {
        return ResponseEntity.ok("这是一个基于SpringMVC的REST扩展服务:" + this.getClass().getName());
    }
}
2
3
4
5
6
7
8
9
10
11
12
13
当在IGServer中添加扩展服务,并重启IGServer服务(注意:插件添加、删除后必须重启服务) ,请求服务基地址http://localhost:8089/igs/rest/services/igs-demo-plugin/ExtensionServer,将返回如下信息
这是一个基于SpringMVC的REST扩展服务:com.example.plugins.server.TestController
开发者也可实现接口,实现自定义的服务自述信息接口,示例如下
@Override
@Operation(summary = "服务信息")
public ResponseEntity<?> getServiceInfo() {
    return ResponseEntity.ok("这是插件igs-demo-plugin提供的REST扩展服务");
}
2
3
4
5
swagger支持,进入http://localhost:8089/webjars/swagger-ui/index.html,选择ExtensionApi,可查看所有扩展服务的REST接口文档
# 插件的classloader
参考 pf4j classloader (opens new window) 类加载的次序,默认是框架优先, PluginClassLoader 使用如下次序依次尝试加载类:
- 如果类名是 java.开头,则使用java system类加载器
- 如果类名是org.pf4j.开头,则使用框架的类加载器
- 尝试使用当前的插件类加载器
- 尝试使用当前插件dependencies的其他插件类加载器加载
- 尝试使用框架的类加载器
# 插件与框架的关系
如图所示,
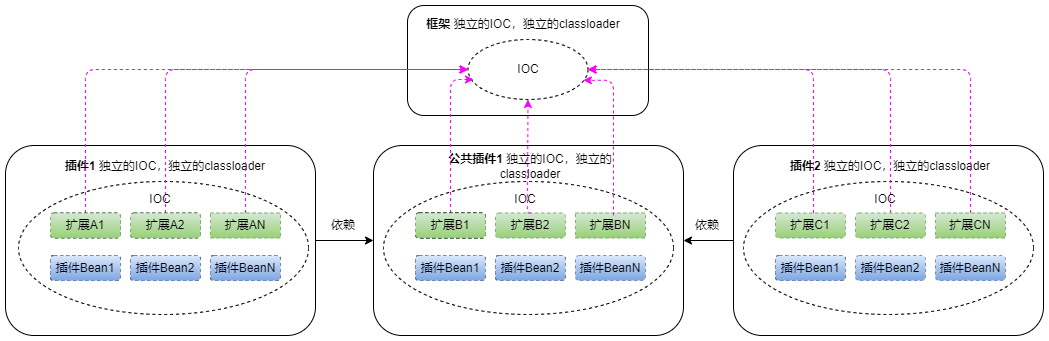
框架、各个插件各自拥有独立的spring IOC容器和classloader。
插件中的所有extension均会注册到框架的IOC容器中,但插件中的普通bean并不会注册到框架IOC容器中。
插件与插件、插件与框架之间的交互,可通过FrameworkContextCapable接口(plugin、extension实现均可)获取框架的IOC容器,在通过框架IOC容器获取任何extension(不论哪个插件中定义的),或框架的普通bean。
注意插件与插件之间有公共的api时,为了打破插件与插件之间classloader隔离的问题,公共的api只能放到框架或共有的dependency插件中,这里建议创建公共的dependency插件,然后在需要通信的插件中均依赖该插件。
上图中,插件1、插件2均依赖公共插件1;插件1的扩展A1、扩展A2、扩展AN,公共插件1的扩展B1、扩展B2、扩展BN,插件2的扩展C1、扩展C2、扩展CN均会注册到框架的IOC容器中,插件1和插件2可通过框架的IOC正常调用公共插件1的扩展B1、扩展B2、扩展BN;但是插件1是无法调用插件2的扩展C1,因为类隔离的问题,插件1无法解析扩展C1。
多插件相互依赖的场景,可参考IGServer扩展服务示例程序multiple-common-api-plugin,multiple-demo1-plugin,multiple-demo2-plugin
# 开发模式下调试
开发模式下,框架直接找maven编译好的class文件,而不是jar包或zip包。
这种模式下,插件元数据信息由plugin.properties 定义。
# 带IGServer源码的调试
单体模式下,mapgis-server模块启动项添加JVM参数-Dpf4j.mode=development开启调试模式,添加JVM参数-Dpf4j.pluginsDir=mapgis-igs-plugins设置插件目录
# 无IGServer源码的调试
如果无IGServer源码,事业部或外部开发者需要在插件源码项目中开发调试插件,则需要关闭keepalived模式(igserver_for_java/bin/env.config中修改),并在igserver_for_java/bin/start-igs.bat中添加相关启动参数。
SET "JAVA_OPTS=-Dfile.encoding=UTF-8 -DCONSOLE_CHARSET=GBK -DCONSOLE_WITH_JANSI=true -Dspring.output.ansi.enabled=ALWAYS -Dmapgis.home=.. -Digs.home=."
@REM 追加下面一行,注意修改%plugins_dir%的值
SET "JAVA_OPTS=%JAVA_OPTS% -Dpf4j.mode=development -Dpf4j.pluginsDir=%plugins_dir% -agentlib:jdwp=transport=dt_socket,server=y,suspend=n,address=5005"
2
3
注意参数-Dpf4j.pluginsDir=指向开发者的插件目录结构,参考pf4j官方plugins demo (opens new window)
# 开发模式下的插件依赖
调试模式下,插件的classloader默认只会找编译后target/classes文件夹,但插件还依赖了除框架(provided)之外的其他依赖,则需要使用
插件dependency用来将插件的依赖拷贝到生成目录中target/lib文件夹下
<!-- 如果插件存在本地(非框架提供)依赖项,比如项目依赖plugin-common-lib,调试状态下,只能通过package将依赖项拷贝到target/lib才能加入到插件类加载器中 -->
<plugin>
    <groupId>org.apache.maven.plugins</groupId>
        <artifactId>maven-dependency-plugin</artifactId>
    <executions>
        <execution>
            <id>copy</id>
            <phase>package</phase>
            <goals>
                <goal>copy-dependencies</goal>
            </goals>
            <configuration>
                <includeScope>runtime</includeScope>
                <outputDirectory>
                    ${project.build.directory}/lib
                </outputDirectory>
            </configuration>
        </execution>
    </executions>
</plugin>
2
3
4
5
6
7
8
9
10
11
12
13
14
15
16
17
18
19
20
# 运行模式下调试
运行模式下,将打包好的插件放到igserver_for_java/plugins文件夹下
需要关闭keepalived模式(igserver_for_java/bin/env.config中修改),并在igserver_for_java/bin/start-igs.bat中添加参数
SET "JAVA_OPTS=-Dfile.encoding=UTF-8 -DCONSOLE_CHARSET=GBK -DCONSOLE_WITH_JANSI=true -Dspring.output.ansi.enabled=ALWAYS -Dmapgis.home=.. -Digs.home=."
@REM 追加下面一行
SET "JAVA_OPTS=%JAVA_OPTS% -agentlib:jdwp=transport=dt_socket,server=y,suspend=n,address=5005"
2
3
# 插件示例程序
代码见 mapgis-igserver (opens new window) 项目
mapgis-igs
  ├─── mapgis-igs-plugin                    # 插件目录,设置-Dpf4j.pluginsDir参数指向的目录
  │     ├──  demo-plugin                    # 单体示例插件
  │     ├──  demo-whth-deps-plugin          # 单体带本地依赖的示例插件,依赖为demo-plugin-lib
  │     ├──  multiple-common-api-plugin     # 多插件示例的公共插件
  │     ├──  multiple-demo1-plugin          # 多插件示例的插件1
  │     └──  multiple-demo2-plugin          # 多插件示例的插件2
  └── mapgis-igs-plugins-deps               # 插件依赖项
        └──  demo-plugin-lib                # demo-whth-deps-plugin插件的依赖
2
3
4
5
6
7
8
9
# 问题
# Package Sealing(包密封)
https://docs.oracle.com/javase/tutorial/deployment/jar/sealman.html
在生成Jar文件时我们可以指定是否将整个Jar或者其中某几个Package进行密封,如果是将Jar文件整个进行密封,那就意味着其内所有的Package都被密封了。Package一旦密封,那么Java 虚拟机一旦成功装载密封Package中的某个类后,其后所有装载的带有相同Package名的类必须来自同一个Jar文件,否则将触发Sealing Violation安全异常。
部分三方库,比如org.hsqldb:hsqldb,就配置了sealed:true。因此就不能出现框架跟插件均包括该库的情况,该库目前已经存在框架中,则插件必须手动排除。
# SpringPlugin
插件类型为SpringPlugin,这时插件中的Spring IOC是由框架提供支撑的,这时插件的Classloader是不能重复出现pf4j-spring相关的(spring-context、spring-core)依赖的,否则插件中的IOC容器会报错。